DKIM – what is it and how do you configure it?


Sending emails in e-commerce and marketing automation today involves much more than just clicking ‘send’. Each email must be recognised by the recipient's server as authentic, secure and intact, otherwise it will end up in SPAM or not reach the inbox at all.
This is where DKIM comes in, a mechanism that confirms that the email actually comes from your domain and has not been altered along the way.
In the rest of this article, we will show you:
- what DKIM is and what you can do with it,
- how it works technically,
- what a DKIM record looks like in DNS,
- how to correctly go through the configuration and verification process.
What is DKIM and what does it mean in practice?
DKIM is an email authentication mechanism that confirms the authenticity of the sender and the integrity of the message. In practice, this means that every email sent from a given domain is cryptographically signed, and receiving servers can verify that the email has not been modified and that it actually comes from the declared sender's domain.
DKIM works at the domain level, not at the individual email address level, which is why it is so important for mass messaging, automation, e-commerce campaigns, and transactional communications.
Thanks to this mechanism, recipients and their mail servers receive a clear signal: ‘this domain can be trusted’.
From a business perspective, DKIM:
- improves message deliverability,
- reduces the risk of spam and impersonation of other senders,
- strengthens the sender's reputation,
- increases the effectiveness of sending emails to customers.
DomainKeys Identified Mail: where does the name come from?
The name DKIM comes from DomainKeys Identified Mail and accurately describes how this standard works. Each email message is ‘identified’ by the domain it comes from, not just by the sender's address visible to users.
In practice, this means that the sending server signs the message using a private key, and the receiving server verifies this signature by retrieving the public key from the domain's DNS record. It is this link between the email and the domain that makes DKIM so effective in combating spam and phishing attacks.
DomainKeys Identified Mail has become an industry standard, supported by the largest receiving servers and email providers, such as Google (Gmail). Without DKIM, large-scale emailing is doomed to failure.
How does DKIM work?
DKIM works by signing each email with the sender's domain private key and then verifying it on the recipient's server.
In practice, the sending server generates a DKIM signature, which is included in the email headers, and then the receiving servers check this signature by retrieving the public key from the DKIM record published in the domain's DNS.
The entire process is automatic and does not require user intervention. When an email is sent, the mail server signs the message and the selected headers are signed using the private key.
When the email reaches the recipient's server, DKIM verification takes place: the server reads the selector, retrieves the appropriate TXT record from the DNS record, and compares the signature with the message content.
If the signature matches, the email is considered authentic and intact. If not, the email may be marked as suspicious, sent to SPAM, or rejected before it is delivered to the recipient.
DKIM and deliverability: less spam, more delivery
DKIM directly affects deliverability because it helps receiving servers distinguish authentic messages from unauthenticated ones. When DKIM is configured correctly, receiving servers receive a clear signal that the domain actually authorises the sending of these emails.
In practice, this means that emails with a valid DKIM signature are less likely to end up in SPAM, more likely to reach the inbox, and are treated as trusted. This is extremely important in e-commerce and Marketing Automation, where the volume of messages sent is high and the sender's reputation is built over the long term.
Read also: Email deliverability in 2026: key observations and challenges for marketers >>>
DKIM also protects against someone impersonating your domain. If the domain does not have a valid DKIM record, receiving servers may reject messages even if the subject line and content are correct.
A well-configured DKIM:
- reduces the risk of ending up in SPAM,
- increases the effectiveness of message delivery,
- strengthens the trust of receiving servers,
- protects the domain from abuse.
What do you need to configure DKIM?
To configure DKIM, you need access to your domain, mail server or email sending tool, and the ability to edit your domain's DNS. In practice, this means that you must own the domain from which you send emails and have access to its DNS zone – usually through your hosting panel or registrar.
Key elements that will be needed in the DKIM configuration process:
- sender domain from which emails are sent,
- mail server or Marketing Automation/email marketing platform,
- access to domain DNS configuration,
- ability to add a TXT record to the DNS zone.
It is worth remembering that DKIM is configured separately for each domain, and sometimes also for subdomains, if emails are sent from different sources.
Step 1: Generating a DKIM key
The first step in configuring DKIM is to generate a DKIM key from your email provider or email sending platform. This process takes place on the side of the tool you use to send emails – your mail server, Marketing Automation system, or other SaaS solution.
Each provider also provides configuration parameters such as the DKIM selector, record name, entry type (TXT), and full record value. This is exactly the data that you will add to your domain's DNS in the next step.
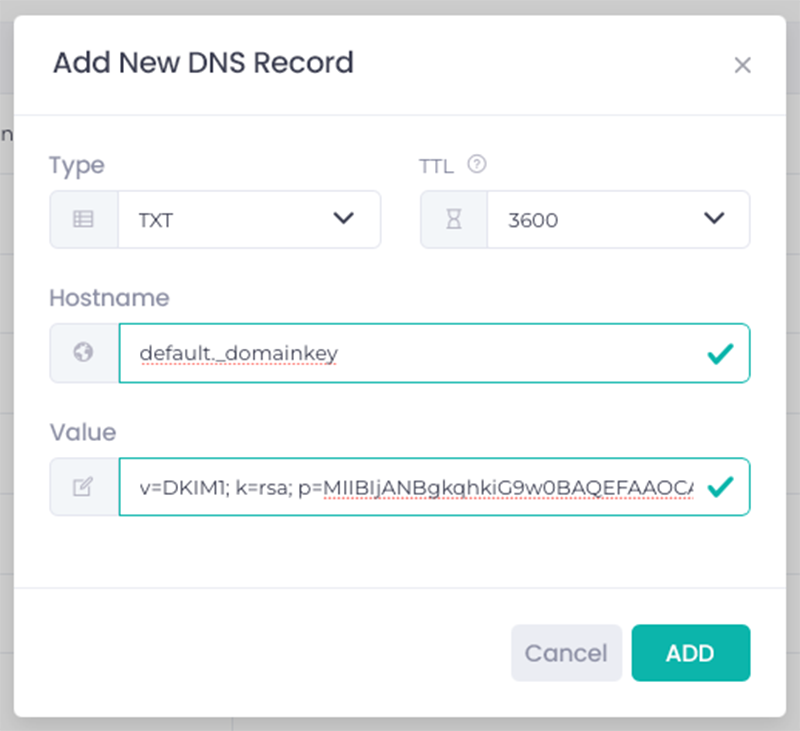
Step 2: DKIM record in DNS: what does it look like and where to add it?
A DKIM record is a special TXT record in the domain's DNS that contains the public key used to verify the DKIM signature. Receiving servers read it when checking the authenticity of an email.
A typical DKIM record:
- is of the TXT type,
- contains a selector (e.g. selector1._domainkey),
- is assigned to a specific domain or subdomain,
- contains a long string of characters that is the public key.
The DKIM record is added to the domain's DNS, i.e. in the hosting panel, domain registrar or DNS provider. The place where the record is added is always the same - the domain's DNS zone, regardless of which tool you use to send emails.
Step 3: Adding a TXT record in the domain zone (DNS configuration)
Adding a TXT record involves pasting the data received from the provider into the appropriate place in the domain's DNS configuration. Although technically a simple operation, it requires accuracy - even a minor typo can cause DKIM to fail.
The most common elements of a TXT record are:
- record name (with selector and domain),
- record type: TXT,
- record value containing the public key,
- optional TTL (Time To Live, i.e. in this case the validity period of the data in the TXT record).
After saving the changes, the record is sent to the DNS, but it is not always visible immediately. DNS propagation can take from a few minutes to even several hours – this is a normal stage of configuration, which is influenced by the TTL value.
Step 4: Verification, i.e. make sure everything worka
The final stage of DKIM configuration is verification, i.e. checking that the DKIM record is correctly visible and used when sending emails. You can perform the verification directly in your email provider's panel or using DNS checking tools such as PowerDMARC.com.
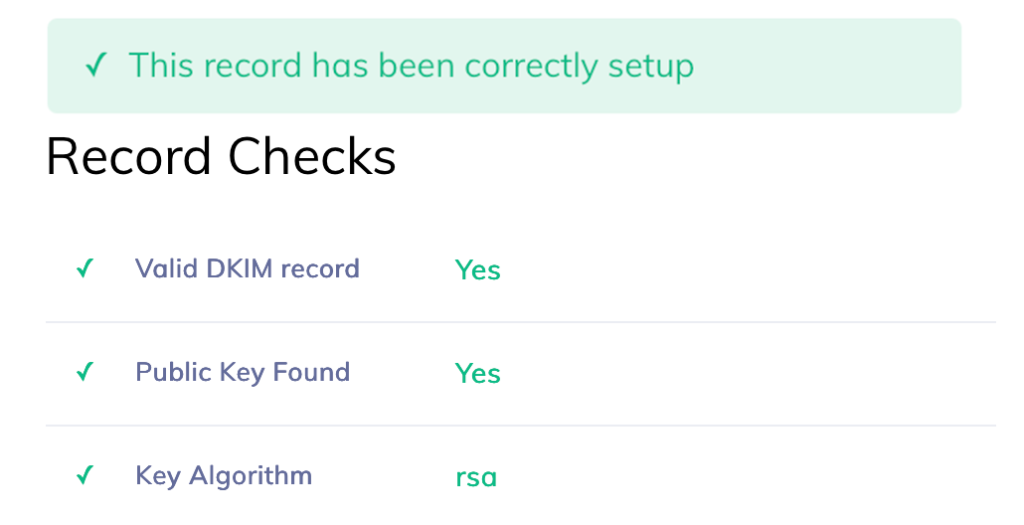
The DKIM verification process consists of:
- checking that the TXT record is correctly read from the DNS,
- confirming that the DKIM signature appears in the headers of sent messages,
- ensuring that the receiving servers correctly accept the signature.
Once DKIM has been successfully verified, it starts working automatically for all subsequent emails sent from that domain.

Summary
DKIM is one of the key email authentication mechanisms that directly affects the deliverability, security, and credibility of sent messages. Thanks to the cryptographic signature, receiving servers can confirm the authenticity of the sender and the integrity of the content, which significantly reduces the risk of spam and abuse.
Proper DKIM configuration requires access to the domain, generating a key from the provider, and adding the appropriate TXT record in DNS. Once verified, DKIM works automatically, supporting the domain's reputation and the effectiveness of email delivery – especially in e-commerce and Marketing Automation, where the scale and repeatability of communication are crucial.
Author: Michał Kidoń
Frequently asked questions (FAQ)
How to check DKIM for a domain?
You can check DKIM for a domain by verifying the presence of a DKIM record in DNS and the headers of a sent email message. In practice, you can use tools to check DNS records or send a test email and analyse the headers for DKIM verification information.
How to generate a DKIM key?
A DKIM key is generated in the mail server panel or email sending tool. The system automatically creates a private key and a public key, and then provides the finished TXT record parameters to be added to the domain's DNS.
What is DKIM security?
DKIM security is a mechanism for signing emails that protects them from modification and spoofing of the sender's domain. By verifying the signature, receiving servers can confirm the integrity of the content and the authenticity of the sender.
DKIM abbreviation - what does it mean?
DKIM stands for DomainKeys Identified Mail. It refers to an email authentication standard that links each message to the sender's domain using a cryptographic signature.
Latest Resources
We share our knowledge


-
![]()
Dashboard
-
![]()
Customer Profile 360°
-
![]()
Preference Center
-
![]()
Website personalization
-
![]()
Consents Management
-
![]()
Automated emails
-
![]()
Email Raports
-
![]()
High Deliverability
-
![]()
User real-time tracking
-
![]()
Automated scenarios
-
![]()
RFM analysis
-
![]()
Drag & drop editor
-
![]()
Omnichannel marketing
-
![]()
Recommendation frames
-
![]()
Message checklist
-
![]()
Banners, pop-ups, forms